Hey traders! Gagan here, your go-to for trading innovations. Today, we’re unraveling the mystery of script installation on IQ Option. Whether you’re a pro or just starting, these steps will turbocharge your trading strategies. Join me as we simplify the process, from script selection to testing. Ready to transform your trading journey? Let’s dive in!
Custom scripts bring a revolutionary edge to your trading arsenal, offering unparalleled benefits that can redefine your approach to the markets. One of the key advantages lies in automation—scripts empower you to automate repetitive tasks, execute trades swiftly, and react to market conditions in real-time. This not only saves precious time but ensures that opportunities are seized promptly. Moreover, the precision and consistency achieved through automation contribute to enhanced trading efficiency. With custom scripts at your fingertips, you can execute complex strategies with ease, minimize human error, and maintain a disciplined trading approach. It’s not just about trading; it’s about trading smarter and staying steps ahead in the dynamic world of financial markets.
How to install Script
1. Account Creation:
– Begin by visiting IQ Option to create an account if you haven’t already. A registered account is essential for accessing the trading platform.

2. Asset Selection:
– Open the trading platform and select any desired asset, such as EUR/USD or EUR/JPY, by clicking on the plus icon in the top menu. This action will open the chosen asset for trading.

3. Accessing Scripts:
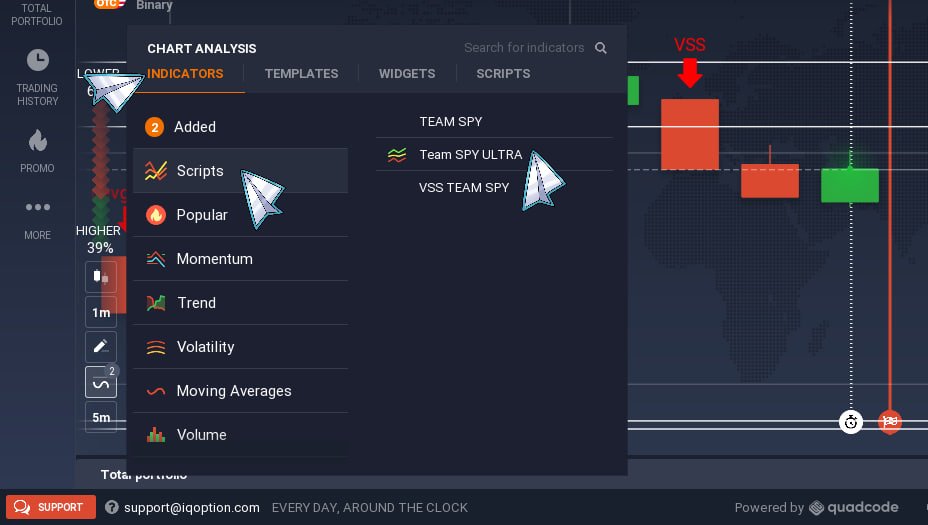
– Navigate to the bottom left side of the selected asset. Click on “Indicators” and then choose “Scripts” from the top menu. Subsequently, click on “Add New Script” to initiate the script management process.

4. Script Input and Saving:
– Paste the provided script data into the designated area on the right side of the screen. Ensure accuracy and completeness of the script. Afterward, save the script to apply it to the selected asset.
Here I am providing you my Script i.e. Team SPY ULTRA SIGNAL SCRIPT for reference you can contact me to get more like these paid script for advance usage.
instrument {overlay = true,
            name = 'Team SPY ULTRA',
            short_name = 'MHIM1-devgagan',
            icon="indicators:ADX"}

show_doji = input (1, "Display Unfulfilled by Doji?", input.string_selection, {"YES","NO"} )
mhi_type = input (1, "Which type of MHI to use", input.integer, 1, 3, 1) - 1

input_group { "CALL - WIN", call_color = input { default="green", type = input.color } }
input_group { "PUT - WIN", put_color = input { default="red", type = input.color } }

function colors(open, close)
    color = 'd'
    if open > close then
        color = 'r'
    elseif open < close then
        color = 'g'
    end
    return color .. ' '
end

sec = security(current_ticker_id, '5m')
ca=0

m2=iff(minute[ca]==2 or minute[ca]==12 or minute[ca]==22 or minute[ca]==32 or minute[ca]==42 or minute[ca]==52,true,false)
m3=iff(minute[ca]==3 or minute[ca]==13 or minute[ca]==23 or minute[ca]==33 or minute[ca]==43 or minute[ca]==53,true,false)
m4=iff(minute[ca]==4 or minute[ca]==14 or minute[ca]==24 or minute[ca]==34 or minute[ca]==44 or minute[ca]==54,true,false)
m7=iff(minute[ca]==7 or minute[ca]==17 or minute[ca]==27 or minute[ca]==37 or minute[ca]==47 or minute[ca]==57,true,false)
m8=iff(minute[ca]==8 or minute[ca]==18 or minute[ca]==28 or minute[ca]==38 or minute[ca]==48 or minute[ca]==58,true,false)
m9=iff(minute[ca]==9 or minute[ca]==19 or minute[ca]==29 or minute[ca]==39 or minute[ca]==49 or minute[ca]==59,true,false)

if m2==true or m7==true or m3==true or m8==true or m4==true or m9==true then
    TD=iff(open>close,"red",iff(open<close,"lime","gray"))
    pt=true
else
    TD=nil
    pt=false
end

plot_candle (open, high, low, close, "WRB", TD)

plot_shape(m4==true or m9==true,"MHI",shape_style.cross,shape_size.large,rgba(0,0,0,0),shape_location.bottom,1,"MHI","white")

if sec and (sec.open_time == open_time and mhi_type == 0) or (open_time == ( sec.open_time + (mhi_type * 60) ) and mhi_type > 0) then
    candle_colors = colors(open[1 + mhi_type], close[1 + mhi_type]) .. colors(open[2 + mhi_type], close[2 + mhi_type]) .. colors(open[3 + mhi_type], close[3 + mhi_type])
    _, count_d = string.gsub(candle_colors, 'd', '')

    result = open_time - close_time

    if count_d == 0 then
        _, count_g = string.gsub(candle_colors, 'g', '')
        _, count_r = string.gsub(candle_colors, 'r', '')

        plot_shape((count_g > count_r and (open > close)),
                    'PUT',
                    shape_style.triangledown,
                    shape_size.huge,
                    put_color,
                    shape_location.abovebar,
                    0,
                    "PUT",
                    put_color)

        plot_shape((count_g < count_r and (open < close)),
                    'CALL',
                    shape_style.triangleup,
                    shape_size.huge,
                    call_color,
                    shape_location.belowbar,
                    0,
                    "CALL",
                    call_color)
    else
        if show_doji == 1 then
            drop_plot_value("PUT", current_bar_id)
            drop_plot_value("CALL", current_bar_id)
        end
    end
end
5. Script Activation:
– Return to the indicator list and locate the newly added script. Choose the script from the list and select the script data you pasted earlier. This step effectively activates the script for the specified asset.

How to use this Script
Once the script is activated, carefully observe the signals it generates. If the script indicates a downtrend or if the asset’s price is in proximity to a resistance level, consider executing a “PUT” trade for a duration of 1 minute (or a time period defined by your chart preferences). This strategy aligns with the anticipation of a downward movement in the market.
Conversely, if the script signals an uptrend or if the asset’s price is near a support level, it suggests a potential upward movement. In such cases, initiate a “CALL” trade for 1 minute (or a time period defined by your chart preferences). This strategic approach maximizes the effectiveness of the custom script, allowing you to align your trades with identified market trends and key support/resistance levels.

By following these meticulous steps, you will seamlessly integrate custom scripts into your trading strategy, enhancing your analytical capabilities and overall trading experience on the IQ Option platform.
Hope you all like the post give feedback or ask questions in comment.
Thanks

